DEX Trading Guide: How to Buy and Sell Tokens On-Chain
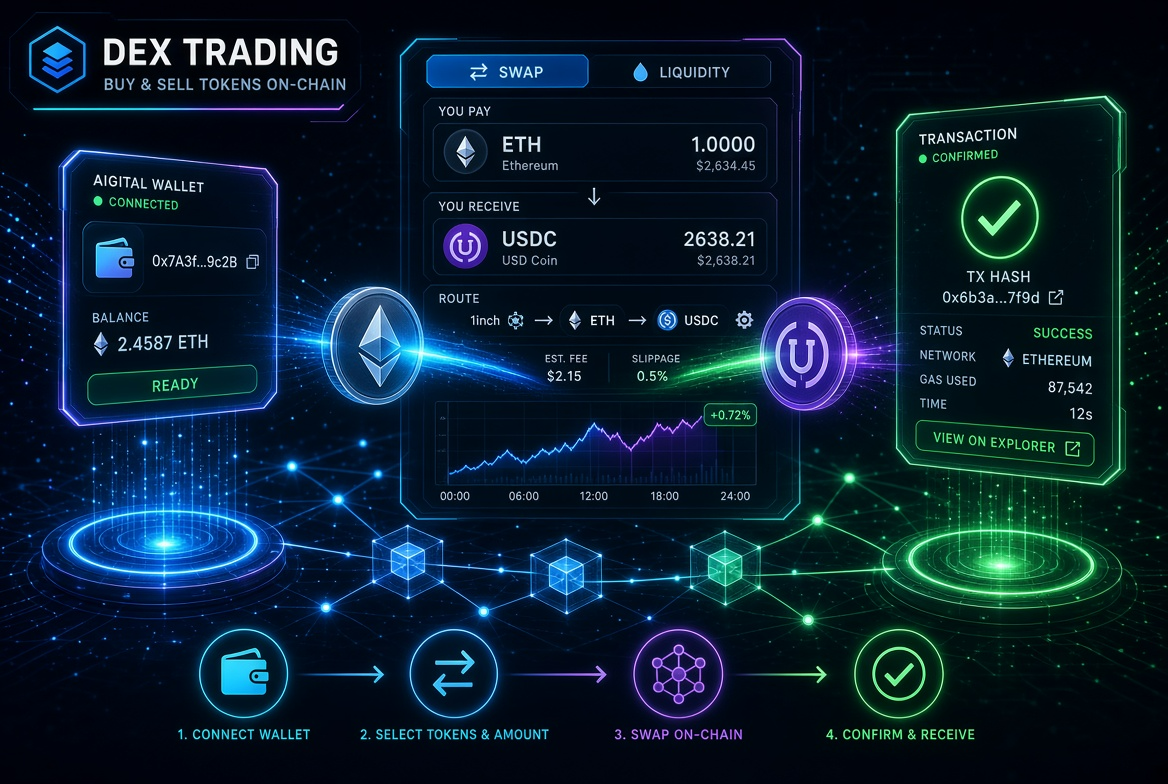
Buying and selling tokens on a DEX essentially means connecting a decentralized trading protocol through your wallet and completing a Token Swap on a specific blockchain network. The full process usually runs: prepare a wallet and Gas → choose the right network → choose the tokens → review the quote → set slippage → complete the approval → confirm the transaction → check the result in a block explorer.
If you are trading on-chain for the first time, what really deserves your attention is not the act of clicking Swap, but the network, the Token contract address, Gas, slippage and approvals — the points that most often lead to lost funds or failed transactions.
How is DEX trading different from an exchange?
When you buy or sell tokens on a centralized exchange, you place orders, get matched and move assets inside an account held by the exchange. On a DEX, you generally interact with smart contracts using your own wallet, and the blockchain network ultimately executes the trade.
A DEX trade can therefore be understood as:
Wallet → DEX front end → Smart contract → Blockchain network → Token transfer
You do not need to keep assets in a centralized DEX account, but you are responsible for your own wallet, network, signatures and trading security.
This is where DEX beginners run into trouble most often: failed transactions, the wrong network, the wrong Token contract, insufficient Gas and mistaken approvals can all happen during a trade.
What do you need before you start trading on a DEX?
For your first on-chain swap, you need at least four things ready.
1. A wallet that supports the target network
Common options include browser wallets and mobile wallets. Different wallets support different networks and features, so you should pick one that suits the chain you plan to trade on.
2. The Token you want to sell
If you hold USDC and want to swap it for ETH, then USDC is the asset you are selling.
One thing to keep in mind: tokens with the same name are not necessarily the same token.
Tokens such as USDT or USDC may exist under the same or a similar name on different networks, and copycat tokens exist as well. For unfamiliar assets, never judge by the token name alone.
3. Assets to pay network fees
Most on-chain transactions require a network fee. In the traditional model, you need the native asset of the corresponding network, such as ETH on Ethereum or BNB on BNB Chain.
The actual cost depends on network congestion, transaction complexity and the current Gas market. Wallets typically show an estimated Network Fee on the confirmation screen.
4. The correct Token contract address
For unfamiliar tokens, confirm the contract address through the project's official channels, a trusted block explorer or official documentation — rather than searching a token name and trading it directly.
This is one of the biggest differences between a DEX and a centralized exchange:
The fact that a DEX lets you trade a token does not mean that token is safe or legitimate.
Step 1: Confirm which blockchain you are on
The first thing to confirm in DEX trading is the network.
For example:
Ethereum
BNB Chain
Arbitrum
Base
Polygon
Optimism
The same token name may exist on several networks, but they are different Token contracts on different chains.
If your wallet holds ETH on Ethereum but the trading page is set to Base, you cannot simply assume that "I have ETH, so I can trade right away". You need to confirm that the wallet, the DEX, the token and the network all match.
On multi-chain DEXs such as Uniswap, you have to select the correct network before trading; trades on different networks use the assets and liquidity of the corresponding chain.
For a first trade, follow this order:
Confirm the network first → then confirm the Token → and enter the amount last.
Not the other way around.
Step 2: Connect your wallet
Open the official website of the DEX you plan to use and choose to connect your wallet.
Connecting a wallet usually only establishes an interaction between the website and your wallet. It does not mean you have transferred assets to the DEX.
What deserves real caution are the requests that follow:
Sign;
Approve;
Permit;
Confirm Transaction;
Before signing anything in particular, make sure you are on the correct official domain.
If someone sends you an "official DEX link" through a private message, Telegram, Discord or another channel, do not connect your wallet directly. Phishing sites can be made to look almost identical to a legitimate DEX page, while asking you to sign something completely different.
Step 3: Choose the Token you sell and the Token you buy
Once you are on the Swap page, you will usually see two assets:
You Pay / Sell: the Token you are selling
You Receive / Buy: the Token you want to receive
For example:
Sell: USDC
Buy: ETH
Then enter the amount you want to swap.
The wallet or DEX will show an estimated output based on current market liquidity.
Note that this quote is only an estimate under current conditions, not a guaranteed final fill amount. There can be a time gap between the quote and on-chain execution, during which market prices and liquidity may change.
Step 4: Review the quote, not just the exchange rate
Do not confirm the moment you see a quote.
Check at least the following metrics:
Estimated output
This is the most direct figure.
For example:
You plan to spend 1,000 USDC to buy ETH, and the page shows an estimated 0.32 ETH.
At this point, do not ask only:
"What is the price of 0.32 ETH?"
You should also look at the trading costs and execution conditions below.
Price Impact
Price Impact refers to the effect your own trade has on the market price.
If a liquidity pool holds relatively little capital and you place a large order in one go, the ratio of assets in the pool can shift noticeably, which worsens the actual execution price.
Therefore:
The larger the trade and the thinner the liquidity, the more you need to watch Price Impact.
Slippage
Slippage is the possible deviation between the execution price and the expected price.
It is not the same thing as Price Impact.
A simple way to think about it:
Price Impact: the effect your trade size itself has on the price.
Slippage: how much price movement you are willing to accept between the quote and actual execution.
Some wallets and DEXs set slippage automatically based on market conditions and also let users adjust it manually. The Swap page of the 1inch Wallet, for example, displays Slippage, the minimum received amount and the network fee among the trade conditions.
Step 5: Understand Token Approval
If you are selling something other than the native asset — a standard Token such as an ERC-20 — you usually need to complete a Token Approval the first time you trade through a given protocol.
For example:
You want to swap USDC for ETH.
A smart contract cannot simply take USDC out of your wallet. You first need to authorize the relevant contract to use a certain amount of USDC.
A trade may therefore involve two steps:
Approve USDC → Swap USDC for ETH
Token Approval is itself an on-chain operation and usually requires a network fee. The official documentation of both 1inch and Uniswap lists Approval as a standard step of a Token Swap.
Why does Approval matter?
Because an approval is effectively telling a smart contract:
"Allow this contract to use some of my tokens."
So Approval is not a button to click without thinking.
If a site of uncertain origin asks you for a high-value approval or even an unlimited one, stop and check immediately.
Be especially cautious in these situations:
A website you do not recognize;
A Token Approval whose purpose you do not understand;
A request to approve assets unrelated to the current trade;
An approval amount clearly larger than the trade requires;
A website that steers you into an action through a private message or an unfamiliar link.
Step 6: Confirm Gas and trading costs
After Token Approval is complete, the next step is normally the actual Swap.
Your wallet will pop up a transaction confirmation screen.
Check carefully:
Network Fee / Gas Fee
and:
Estimated output
Trade route
Slippage or minimum received amount
Gas is not a flat fee charged uniformly by the DEX platform; it relates to how the underlying blockchain network executes the transaction.
The more congested the network and the more complex the transaction, the higher the actual network cost may be.
Note that some wallets now offer Gas sponsorship or Gasless Swap features on certain networks, but that is a feature of the wallet or of a specific trading mode — it should not be read as "DEX trading inherently needs no Gas". MetaMask, for example, currently offers Gas Included / Gasless features for some networks and transactions.
Step 7: Confirm the Swap
Once you have verified the trade parameters, click confirm in your wallet.
After submission, a trade usually goes through:
Wallet Confirmation → Pending → Blockchain Confirmation → Success
If the trade succeeds, the wallet will generally update the Token balance.
If the balance does not appear right away, do not immediately repeat the trade.
Blockchain transactions take time to confirm, and network congestion, transaction status and wallet interface refresh can all cause a delay in the displayed balance.
You can check the transaction status in a block explorer. Uniswap's official guide also recommends checking the transaction details in a block explorer after the Swap is complete.
Step 8: How do you confirm the trade actually succeeded?
Do not rely only on the balance shown on the wallet page.
The more reliable method is to check the transaction hash.
An on-chain transaction usually corresponds to a Transaction Hash.
Put the transaction hash into the block explorer for the relevant network, and you can view:
Transaction status;
Sender address;
Recipient address;
Token transfers;
Gas;
Block height;
Transaction time;
Contract interaction details.
If it shows Success, the transaction has normally been confirmed on-chain.
If it shows Failed, the transaction execution failed.
One important point to note here:
A failed transaction does not necessarily mean your assets were taken.
However, network fees already consumed are usually not automatically refunded when a trade fails, because the blockchain has already performed the computation involved.
What should you do if a DEX trade fails?
If a Swap fails, do not keep clicking repeatedly right away.
First work out why it failed.
Cause 1: Slippage is too low
This is one of the common causes.
If the market price moves beyond the allowed range while the transaction is being confirmed, the trade may not execute under the conditions you set.
The official troubleshooting documentation of some wallets also lists slippage as a major cause of failed Swaps.
The answer is not simply to set Slippage very high. First judge whether the market is moving fast and whether your trade size is too large.
Cause 2: Insufficient Gas
If the wallet does not hold enough of the network's native asset to pay the fee, the transaction may not be submitted or executed properly.
So before swapping, make sure the wallet has enough balance for network fees.
Cause 3: Insufficient liquidity
If a Token has very low liquidity, a large trade may not be able to complete within the price range you accept.
In that case, blindly raising Slippage is not a good idea.
Because:
Insufficient liquidity + high Slippage
may mean you end up accepting a fill price far worse than expected.
Cause 4: The Token itself has trading restrictions
Some Token contracts may include:
Buy or sell restrictions;
Per-transaction limits;
Address restrictions;
Blacklist mechanisms;
Dynamic fees;
Special transfer logic.
So even if the DEX page can show a quote, that does not guarantee the trade will succeed.
When buying an unfamiliar Token, price is not the most important thing
This is something DEX beginners should pay particular attention to.
On a centralized exchange, users can usually obtain a good amount of standardized information from the trading pair, the project page and similar sources.
On-chain, anyone can deploy a Token.
So when you see a Token with:
a surging price + very low liquidity + heavy social media hype
that does not mean it is worth buying.
You should at least check:
1. Contract address
Confirm whether it is the address officially published by the project.
2. Liquidity
Liquidity that is too low means you may get in easily, but have a hard time selling out at a reasonable price.
3. Holder distribution
If a few addresses hold the vast majority of the Token, be wary of concentrated sell-off risk.
4. Token transfer rules
Some Tokens may carry special trading restrictions.
5. Approval risk
Confirm exactly which contract you authorized, and for how much.
6. Whether both buying and selling actually work
For unfamiliar small-cap coins in particular, do not test only "can I buy".
The question that really matters is:
will I be able to sell normally later.
Why can you buy in on a DEX but not sell out?
This situation can have several causes.
One typical case is that the Token contract carries special restrictions, such as blocking ordinary addresses from selling, or setting abnormally high trading fees.
Another case is simply liquidity that is too low.
For example:
You use 1,000 USDC to buy a small-cap coin, and the page shows the trade can go through.
But because the pool is very small, your trade already takes up a large share of the liquidity. When you later try to sell, you may find the price impact is enormous and the assets you can get back fall far short of expectations.
So whether a Token is suitable for trading cannot be judged only by:
"Can I buy it."
You should also ask:
"Is there enough liquidity for me to exit."
How should you set Slippage in DEX trading?
There is no fixed slippage number that suits every trade.
Because a reasonable Slippage depends on:
Token liquidity;
Trade size;
Market volatility;
Network latency;
The DEX mechanism;
Trading pair depth.
A common mistake is:
"Trade failed → raise Slippage → trade again."
That may improve the odds of a fill, but it also means you are willing to accept a larger price deviation.
A more reasonable approach is to check in this order:
Liquidity → Price Impact → Market volatility → Trade amount → Slippage
If Price Impact is already high, raising Slippage alone will not solve the underlying problem.
A complete DEX trading checklist
For your first on-chain trade, work through this checklist item by item.
Before trading
Confirm the official DEX website
Confirm the wallet
Confirm the blockchain network
Confirm the Token contract address
Confirm the wallet holds enough trading assets
Prepare enough Gas
Check Token liquidity
While trading
Confirm the Sell Token
Confirm the Buy Token
Check the estimated received amount
Check Price Impact
Check Slippage
Check the Network Fee
Check the trade route
Review the Approval carefully
Confirm the final trade parameters
After trading
Save the Transaction Hash
Check the status in a block explorer
Confirm whether the Token arrived
Confirm the actual Gas
Check for unnecessary Token Approvals
A complete DEX trading example
Suppose a user plans to do the following on the Ethereum network:
Use 1,000 USDC → swap for ETH
The full process can be simplified as:
① Connect the wallet
Confirm the wallet is on the Ethereum network.
↓
② Select USDC → ETH
Enter 1,000 USDC.
↓
③ Review the quote
Check how much ETH you are estimated to receive.
↓
④ Check Price Impact
Confirm the trade size is not causing an unusually large price effect.
↓
⑤ Check Slippage
Confirm the range of price movement you can accept.
↓
⑥ Check Gas
Confirm the wallet holds enough ETH to pay the network fee.
↓
⑦ Approval
If USDC has not been approved before, complete the approval first.
↓
⑧ Swap
Confirm the trade.
↓
⑨ Wait for block confirmation
Do not resubmit while the transaction is still pending.
↓
⑩ Check the transaction hash
Confirm whether the transaction succeeded.
↓
⑪ Check the ETH balance
Confirm the swap result has arrived.
The process looks like only a few steps, but the parts that actually go wrong cluster around the network, the contract address, approvals, slippage and transaction confirmation.
The 7 most common DEX trading mistakes
Mistake 1: Looking only at the Token name, not the contract address
The same name does not mean the same asset.
Mistake 2: Choosing the wrong network
Your assets are on Ethereum while the trade is set to another network — a common beginner mistake.
Mistake 3: Not preparing Gas
Holding USDC in your wallet does not mean you can directly pay Ethereum network fees.
Mistake 4: Setting Slippage too high just to get a fill
That can get your trade filled at a terrible price.
Mistake 5: Not checking the Approval
An approval is itself an important asset security permission.
Mistake 6: Resubmitting over and over after a failed trade
Check the reason for the failure first instead of repeating the action blindly.
Mistake 7: Treating the DEX as a project screener
A DEX provides the trading mechanism, but it will not judge for you whether a Token is safe or a project is reliable.
Is DEX trading safe?
A DEX by itself cannot guarantee that trading is safe.
Compared with a centralized exchange, one important feature of a DEX is that users have stronger control over their assets, but they also carry more operational responsibility.
The main risks include:
Smart contract risk: protocol code may contain vulnerabilities.
Token contract risk: some Tokens may carry malicious or abnormal trading mechanisms.
Approval risk: a wrong approval can leave a malicious contract with permission to move your assets.
Liquidity risk: insufficient liquidity can cause severe price impact.
Slippage risk: the actual execution price may deviate from expectations.
MEV risk: some public on-chain transactions may be affected by front-running, sandwiching and similar strategies.
Network risk: congestion can cause delays, failures or higher costs.
Operational risk: the wrong network, wrong address or wrong Token can all cause irreversible losses.
So "decentralized" does not mean "risk-free".
More precisely, it means that part of the authority over trade execution and asset management has shifted from a centralized platform to users, smart contracts and the blockchain network.
FAQ
Do I need to register an account to buy coins on a DEX?
Usually you do not need an account in the sense of a traditional centralized exchange. Users generally connect to a DEX through a compatible wallet and then complete actions by signing with the wallet or sending an on-chain transaction.
Does DEX trading always require Gas?
A traditional on-chain Swap usually requires a network fee, but how it is paid depends on the network, wallet and trading mode you use. Some wallets now support Gas sponsorship or Gasless features on certain networks, so it is not accurate to assume that every trade requires you to directly hold the native Token to pay Gas.
Why does the first trade require an Approval?
Because Tokens such as ERC-20 usually require you to authorize the smart contract to use the relevant Token before the protocol can execute the Swap. The Approval itself is normally an on-chain operation too.
Does a failed DEX trade cost me money?
When a trade fails, the trade itself usually does not complete the asset swap, but the network computation fees already consumed may not be refunded. Check the on-chain record through the transaction hash for the specifics.
Why is my Token not showing in my wallet?
It may be that the transaction has not been confirmed yet, or that the wallet has not automatically recognized the Token. First confirm in a block explorer whether the transaction succeeded, then check the Token contract address to see whether the wallet needs the asset added manually.
Can a DEX swap a Token on one network directly for a Token on another network?
A normal Swap usually exchanges Tokens on the same chain. Cross-chain trading involves a Bridge or a cross-chain protocol, and "swapping" and "bridging" should not be treated as the same operation. Some wallets and aggregators have now integrated cross-chain features into the trading interface, but the actual execution mechanism and risks are still different.
Summary
The operational flow of DEX trading is not complicated, but what really determines whether a trade is safe and reasonably priced are the details along the way.
The full process can be remembered as:
Confirm the official entry point → connect the wallet → confirm the network → verify the Token contract → enter the trade amount → review the quote → check Price Impact → set a reasonable Slippage → complete the Approval → confirm Gas → submit the Swap → check the transaction hash.
Among these, beginners should focus on five things above all:
Do not pick the wrong network, do not mistake the Token address, do not sign Approvals carelessly, do not raise Slippage blindly, and always check the on-chain record after the trade.
If you are only swapping mainstream Tokens in small amounts with ample liquidity, DEX trading is relatively simple. If unfamiliar small-cap coins, large trades or low-liquidity markets are involved, then liquidity, price impact, approvals and contract risk need to be considered ahead of price.
Crypto assets and on-chain trading carry relatively high risk. Token prices can be highly volatile, and factors such as smart contracts, liquidity, the network, approvals, MEV and trade execution can all lead to losses. This article introduces the basic trading mechanics and operational flow of a DEX and does not constitute investment or trading advice.
Leitura recomendada
Veja mais